Environmental Monitoring with Secure Scuttlebutt
22 July, 2023%0DWVKJaZiLoSm7jNXZPXr024v7vifD3ECgwotvrGZ7w=.sha256
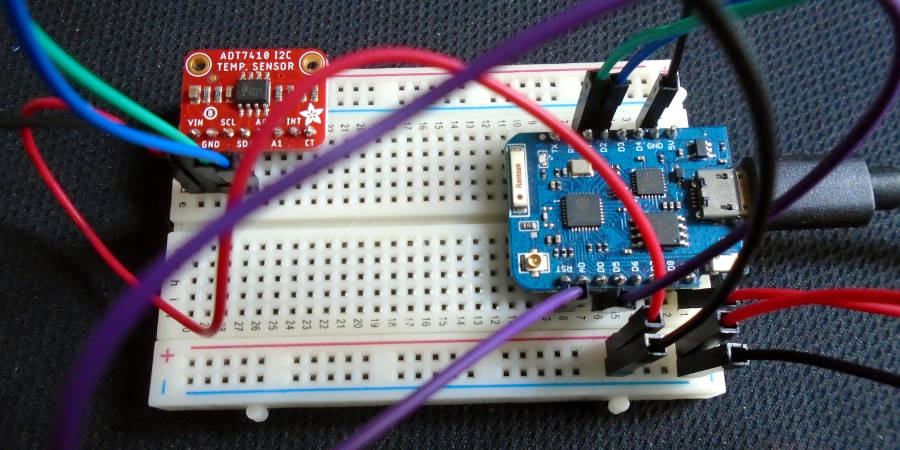
Here I present a simple means of logging temperature values to Scuttlebutt using the D1 Mini (ESP8266), ADT7410 temperature sensor and a Scuttlebutt node (solar implementation) running on a laptop.
Rationale
While Secure Scuttlebutt is most widely known and utilised as a social network — or, more precisely, a network of networks — the underlying protocol is well-suited to non-social applications such as environmental monitoring. Indeed, the append-only nature of the log and simple replication protocol make it an excellent fit for storing and distributing sensor readings between peers in a network. A unique HMAC key can be specified for the “secret handshake” conducted before replication occurs between two peers, thereby allowing sensor networks to be created which are separate from the main Scuttlebutt network.
By experimenting and sharing about such approaches, I hope to encourage others to seek out novel applications of the Secure Scuttlebutt protocol.
Process
The proof-of-concept in this case is very simple and easily replicated with a few electronic components, software and a basic understanding of embedded programming.
The D1 Mini microcontroller has an ESP8266 module which provides WiFi capabilities. The microcontroller connects to a local WiFi network, reads the temperature from the sensor and then publishes the data to a Scuttlebutt node running on another device (in my case, a laptop). The data is sent over HTTP as a POST request to a JSON-RPC server exposed by the Scuttlebutt node. Once the request has been made and the response received, the microcontroller enters into a deep-sleep state for a predetermined duration. Upon waking it repeats the connect-read-publish sequence.
Code
Here we have the Arduino code (C++) for the microcontroller and sensor. Note that there is a lot of room for optimisation and improvement.
// Import ADT7410 temperature sensor libraries. #include#include // Create the ADT7410 temperature sensor object. Adafruit_ADT7410 tempsensor = Adafruit_ADT7410(); // Import ESP8266 WiFi and HTTP libraries. #include #include #include // Define the access point SSID and password. const char* ssid = "portal"; const char* password = "enter the void"; // Define the solar JSON-RPC server address and port. const char* jsonRpcServer = "http://192.168.8.136:3030"; // Define the deep sleep duration in microseconds. // Example: 60e6 microseconds is 60 seconds. unsigned long sleepDuration = 60e6; void setup() { Serial.begin(115200); Serial.println("Booting..."); // Make sure the temperature sensor is found. if (!tempsensor.begin()) { Serial.println("Couldn't find ADT7410 sensor!"); while (1); } // Set WiFi module in station mode. WiFi.mode(WIFI_STA); // Attempt WiFi connection with access point. WiFi.begin(ssid, password); Serial.println("Connecting..."); // Wait until a connection has been opened. while(WiFi.status() != WL_CONNECTED) { delay(500); Serial.print("."); } Serial.println(""); Serial.print("Connected to WiFi network with IP Address: "); Serial.println(WiFi.localIP()); // Check WiFi connection status. if(WiFi.status() == WL_CONNECTED){ WiFiClient client; HTTPClient http; // Read the temperature in degrees Celcius. float temperatureReading = tempsensor.readTempC(); // Print the temperture reading, e.g. "Temperature: 25.06*C". Serial.print("Temperature: "); Serial.print(temperatureReading); Serial.print("*C\t"); // Initialise the HTTP client. http.begin(client, jsonRpcServer); // Specify the JSON content-type header. http.addHeader("Content-Type", "application/json"); // Build JSON-RPC request to publish a post-type SSB message. // Example: `{"jsonrpc": "2.0", "method": "publish", "params": {"type": "post", "text": "25.06"}, "id":1 }`. String requestPrefix = "{\"jsonrpc\":\"2.0\",\"method\":\"publish\",\"params\":{\"type\":\"post\",\"text\":\""; String requestWithTemperature = requestPrefix + temperatureReading; String jsonRpcRequest = requestWithTemperature + "\"}, \"id\":1}"; // Send JSON-RPC request over HTTP. int httpResponseCode = http.POST(jsonRpcRequest); Serial.print("HTTP Response code: "); Serial.println(httpResponseCode); // Free resources http.end(); } else { Serial.println("WiFi disconnected"); } // Initiate deep sleep. Serial.println("Entering deep sleep mode..."); ESP.deepSleep(sleepDuration); } void loop() { }
Demonstration
The Scuttlebutt node receives the request and publishes the message to the local log.
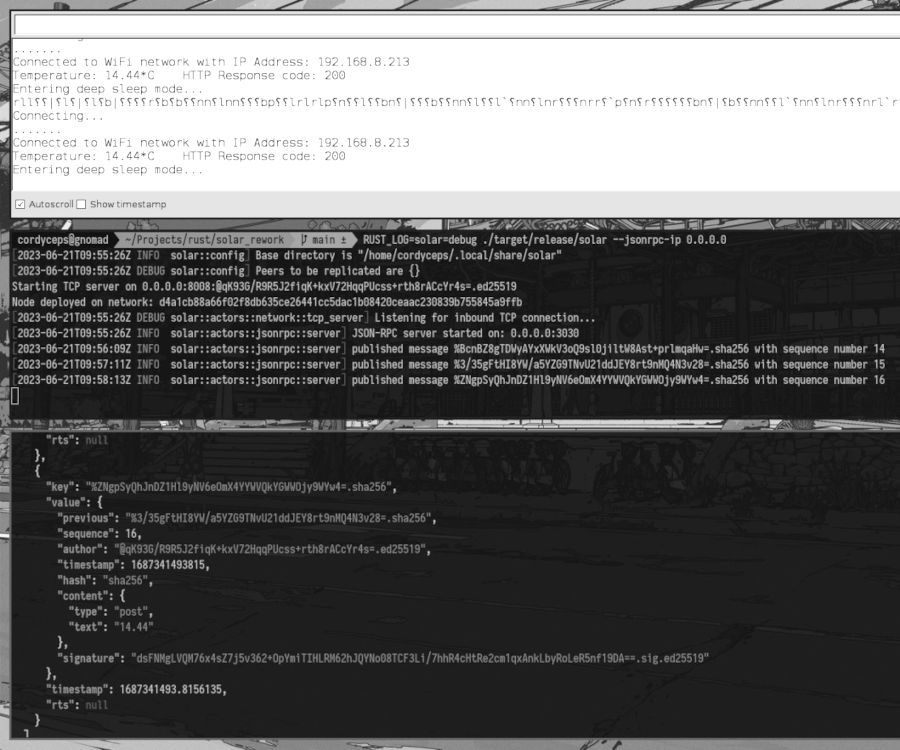
The top window is the serial output from the microcontroller showing connection to the WiFi network, temperature readings and HTTP response codes.
The middle window shows the log output of the solar Scuttlebutt node, including messages being published to the log via the JSON-RPC server.
And the bottom window shows Scuttlebutt messages in the form of JSON, outputted by querying the `solar` node via JSON-RPC using `curl`.
Call for Participation
As the current maintainer of the solar Scuttlebutt implementation, I am interested in collaborating with researchers and practitioners in order to further explore the suitability of Secure Scuttlebutt for environmental monitoring. I am happy to assist with the usage of solar and to add features or craft simple tools to assist in such endeavours.
Thanks for reading!